简介
这是我的第一篇博客,这篇文章主要讲述了我搭建个人网站,以及如何自动构建发布静态页面的过程。
前言
最近正好整理记录的笔记,之前写的比较随意,不太好整理,而且之前早就想搭建自己的个人博客网站,正好这次刚好又时间折腾折腾。
搭建静态网站的框架网上比较多,文档和教程大部分也比较全,这次就直接选择口碑比较好也容易的 Hugo 在 Github 下搭建一个。
安装 Hugo
在 Win10 下使用命令安装:
scoop install hugo
验证安装:
hugo version
这里的Scoop是 Win10 平台下的软件包管理工具之一,非常方便,感兴趣可在 GitHub或CodeChina 上查看。
更多的安装方式和文档可以参看Hugo 官方安装教程.
新建站点
新建站点项目
hugo new site tech-blog
Congratulations! Your new Hugo site is created in D:\tech-blog.

Just a few more steps and you're ready to go:

1. Download a theme into the same-named folder.
   Choose a theme from https://themes.gohugo.io/ or
   create your own with the "hugo new theme <THEMENAME>" command.
2. Perhaps you want to add some content. You can add single files
   with "hugo new <SECTIONNAME>\<FILENAME>.<FORMAT>".
3. Start the built-in live server via "hugo server".

Visit https://gohugo.io/ for quickstart guide and full documentation.
配置一款主题
Hugo主题提供了大量模板,这里用的主题是 PaperMod,详细文档(安装、配置)可以在Github上查看。
更多的主题可以在 Hugo 主题 上查看
cd tech-blog
git init
git submodule add https://github.com/adityatelange/hugo-PaperMod.git themes/PaperMod --depth=1
git submodule update --init --recursive
修改配置文件 config.toml 或者 config.yaml,.toml格式配置可参考官方文档,.\config.yaml基本内容如下
baseurl: "http://zone.desiyonan.tech"
title: "DnF's Zone"
defaultContentLanguage: zh
hasCJKLanguage: true
theme: PaperMod # 主题
params:
  AuthorName: "DnF"
  GitHubUser: "desiyonan"
启动本地服务器
hugo server -D
Start building sites …

                   | EN
-------------------+-----
  Pages            | 12
  Paginator pages  |  0
  Non-page files   |  0
  Static files     |  1
  Processed images |  0
  Aliases          |  2
  Sitemaps         |  1
  Cleaned          |  0

Built in 35 ms
Watching for changes in D:\tech-blog\{archetypes,content,data,layouts,static,themes}
Watching for config changes in D:\tech-blog\config.yaml
Environment: "development"
Serving pages from memory
Running in Fast Render Mode. For full rebuilds on change: hugo server --disableFastRender
Web Server is available at http://localhost:1313/ (bind address 127.0.0.1)
Press Ctrl+C to stop
现在可以直接访问 http://localhost:1313/ 查看站点,不过要看文章具体效果可以先新建测试文章
hugo new post/test.md
'## Test' | out-file -a -e utf8 .\content\post\test.md
访问 http://localhost:1313/post/test 就可以看到测试效果
最后基本仓库的初始化
git commit -am "init"
git push -u origin master
配置 Github Pages
基本框架已经搭建完成,需要能够在公网直接访问网页还需要配置 Github Pages。
看了网上不少的博客,大部分都是在本地编辑 .md 文档,完成后通过 hugo 命令构建输出,最后再把输出的 public 目录推送到 Github 上。
再尝试了一两次后太繁琐了,而且也不是我想要的效果,最后在知乎上看到最理想的效果:在本地编辑 .md 文档后推送到直接仓库后就可以通过公网看到效果。详细可以看知乎上的文章,说明的很清楚,重复的字也懒得码了,这里简单说明下大致流程和需要注意的地方。
流程的大致原理:
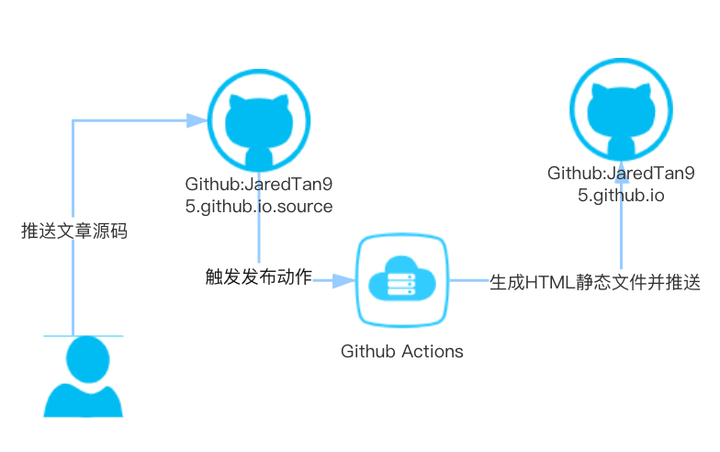
简单的说就是:
- 建两个仓库: 一个放文档源码,一个放构建后的页面代码
- 给源码仓库添加
Action,当推送master代码时自动构建页面,再推送到页面仓库
需要注意:
- 放构建后的静态页面的仓库需要配置
Github Pages - 两个仓库需要一对
SSH密钥,源码仓库配置私钥,页面仓库配置公钥 Github Action配置需要根据实际情况改动下
以下是我的改动后 Action 配置内容
name: Deploy Hugo Site to Github Pages on Master Branch

on:
  push:
    branches:
      - master

jobs:
  build-deploy:
    runs-on: ubuntu-18.04
    steps:
      - uses: actions/checkout@v1  # v2 does not have submodules option now
        with:
          submodules: true

      - name: Setup Hugo
        uses: peaceiris/actions-hugo@v2
        with:
          hugo-version: '0.83.1'
          extended: true

      - name: Build
        run: hugo --minify

      - name: Deploy
        uses: peaceiris/actions-gh-pages@v3
        with:
          deploy_key: ${{ secrets.ACTIONS_DEPLOY_KEY }} # 这里的 ACTIONS_DEPLOY_KEY 则是上面设置 Private Key的变量名
          external_repository: desiyonan/zone # Pages 远程仓库
          publish_dir: "public"
          keep_files: false # remove existing files
          publish_branch: master  # deploying branch
          commit_message: ${{ github.event.head_commit.message }}
不同的点:
        with:
          submodules: true
因为之前配置主题时是到了 git submodule,所以这里必要有,不然构建后没有主题。
其次
          external_repository: desiyonan/zone # Pages 远程仓库
          publish_dir: "public"
external_repository 是放页面仓库,publish_dir 是构建后需要推送的目录,hugo 默认的构建目录就是 public,具体配置看下 config.toml 或者 config.yaml 下有没有
publishdir: xxxx
不复杂,摸索个把小时就行了。两个仓库的关联配置到此位置,还需要最后一步配置页面仓库的Github Pages
打开对应 Github 仓库页面,找到 Setting 页签,然后可以在侧边栏看到 Pages 设置

需要配置的主要是 Source 选择分支和目录,自定义域名可以通过 Custom domain 配置,域名配置不是必须,如果配置了还需要新增 static/CNAME 文件,文件内容就是自定义的域名,中途改了几次域名就是没改文件导致访问不了网站。
PS>cat static\CNAME
zone.desiyonan.tech
至此,耗时两天,一个完整的自动化部署个人博客终于搭建完了,网站的美化后面再一步步来。